Beginning with my eyes, I could almost feel the warm and fuzzy feeling charting its course, registering to my brain and yielding a smile as I looked over some of the shots from my day trip to St. Helena in Napa County, California. Priceless.
At the time, I could not help the nagging sense of loss as I wondered how much better they would have turned out if only I had…
With the stars all lined up on that day – just the right mix, beautiful location, great weather and an abundance of interesting subjects and backdrops to pick from; I could not have asked for a more perfect day.
Even at that, I cannot help but wonder how much better that day trip to St Helena would have turned out if only I knew then what I know now. If only I had done the tour before the trip. I mean the one-day walking Photo Tour. It was worth every step or should I say worth every penny and more.
The full story, I choose to save for another day.
But here are a few pointers from the course I walked away with, giddy with excitement at the possibilities of taking my photography to the next level.
A) Doing your Homework ahead of taking the picture keeps the headaches at bay.
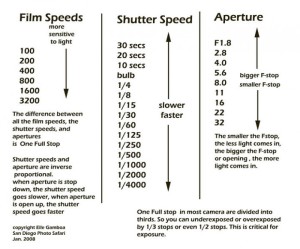
1) Enough Light Already – For example determine if you need more or less light and if you do need more light adjust your ISO level accordingly. ISO (International Standards Organization) is a measure of your camera’s sensitivity to light. The darker the environment the higher the ISO required to make up for the difference. An ISO of 200 would work better on a sunny day versus a space with low light and no flash.
Triangle of Exposure.

2)Static or moving shots? Shutter speed is King. Shutter speed controls the length of time the shutter of the camera is open and how much light is allowed to strike the image sensor. To capture a waterfall, a higher/longer (1/800th of second) shutter speed captures a blurred and fuzzy image and shutter priority with lower/shorter (1/8000th of a sec) shutter speed freezes the image and background in time, such as a basketball dunk or a moving car.
3)In Focus vs Out of Focus – How much depth of field do you want in your photograph? Aperture Setting is the way to go. This setting gives the photographer some control such that where the choice is to have the subject in focus and the background is blurred, a large aperture (f/2) will work and for an image that captures the full background, a smaller aperture (for example f/22) is a more suitable choice.
B) What’s story will it tell? the one you want it to or…
Defining what elements you want in the picture and not including any thing that would distract from your subject is very critical and one way to do this is to blur out the background.
Other creative ways to focus attention on the subject is to use natural lines that draw the eyes towards the subject, use of the natural backdrops as a frame for your shot and taking the picture from interesting angles, all add elements of interest to the picture.
All in all, it has and continues to be a learning experience. My only worry is that armed with all this information and the fruit of months of research, a Nikon DSLR camera of my choice, this is nothing short of a dangerous combination because there is no stopping me now!


